The Awful Forums > The Finer Arts > Creative Convention > How to screen print posters for fun and profit (56k go to kinko's)
Search thread:
(4): 1 2 3 4 »
Author
Thread Post New Thread    Quick ReplyNormal Reply
bradbane
May 21, 2004

DON'T CLOSE SH/SC THREADS GOD DAMNIT
Screen printing is one of those things that I think everyone, artist or not, should learn to do. It's a cheap, easy (and fun!) way to create a bunch of awesome, identical copies of whatever you want. Screen printing is one of the most versatile printmaking processes out there - you can screen print anything from paper (like I'm going to show you how to do) to glass or computer chips. In this thread I'll show you how to print posters, but you can take this information and apply it to most other things, like shirts or whatever you want.

I know this post is long and it seems complicated, but it's actually really easy and doesn't take much time.

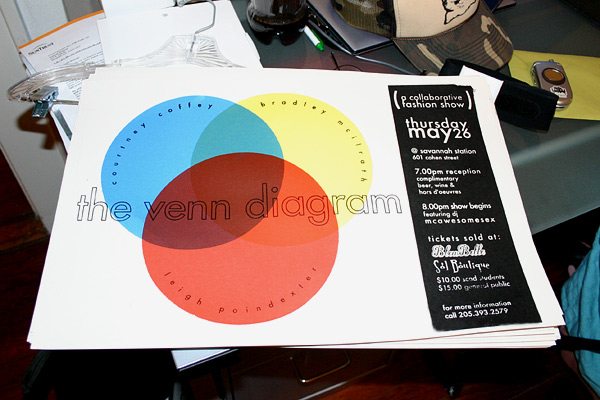
This poster is one I'm printing for a friend's fashion show, it's not done but it will be later tonight I think, I'll post pics of the finished ones later. I'm taking a break from working on final projects to do this and haven't slept in a while, so excuse me if some of this doesn't make sense, and feel free to ask questions if something's not clear.

WHAT IT IS
Screen printing is the process of pushing ink through a stencil (that's adhered to a fine mesh) to create perfect, identical copies. There are various ways of making the stencil, the method I'm going to explain uses photo-emulsion and is the easiest and least labor intense.

SUPPLIES
When I say you can screen print for cheap, I mean cheap. I know someone, who enjoys pain, who screen printed by stretching panty hose over an embroidery loom and used glue to make his stencil. I don't recommend that, especially when professional supplies don't cost much.

Yes, you can go down to your local art store and pay a shit load for extremely crappy quality supplies. Yes, you can buy one of those terrible, terrible Speedball kits. That stuff will work (barely and probably with way more problems than if you used real supplies), but I guarantee if you're going to do this more than once that stuff will be useless after doing your first run of prints. I'm going to list what you need, and also where I recommend buying it from (I'm not getting a commission or anything, these are just places I've had experience with).

- A screen - A screen consists of a frame and mesh. There are various types of frames, wood being the cheapest and shittiest. You should go with an aluminum frame (won't warp, holds better registration, keeps mesh tighter/longer, more durable, etc.), they're usually a tiny bit more expensive than wood but they're definitely worth it. Mesh comes in various "sizes" which refer to how many threads are in it. The higher the number, the less ink gets put down and the more detail the screen can hold. For posters, you want 200 or 230 mesh. Note that for shirts and other things 110 is pretty standard. Remember that you need at least 4-6" around your image area, and that screen measurements are the outside dimension, not the usable inside portion. Example: for my 12x18 posters, I use 23x31 screens.

I recommend: Aluminum screens with 200 mesh from www.rhemadurascreen.com

- a squeegee - This is what you will use to push the ink through the mesh. There's a handle and a blade. The blades come in different hardnesses, if you have a choice when buying one just get 70 but it's not really important. Squeegees are about $1 per inch, and you need one that is at least 2 inches bigger than your image. Example: for my 12x18 posters, I use a 14" squeegee.

I recommend: www.rhemadurascreen.com or www.victoryfactory.com

- (OPTIONAL) scoop coater - These are nifty and if you think you'll be doing this more than once get one, they spread your emulsion on the screen quickly and evenly.

I recommend: rhemadurascreen.com has the nicest ones i've used by far.

- emulsion - Emulsion is a light sensitive liquid that you spread on your screen. This is what makes the magic happen.

I recommend: Ulano QTX from www.valleylitho.com

- stuff to expose - To expose your screen, you need a clamping work light, a 150 watt light bulb, some sort of rod (like a shower curtain rod), two chairs/stools, a piece of paper/cardboard spray painted matte black (NOT glossy black), your artwork printed on either a transparency or vellum, and (optional but recommended) a piece of glass as big as your image.

- jiffy clamps - these bolt down to a table or other surface and then clamp your screen in place. You need a set of two, and should be able to get them from any of the places I've listed so far.

- paper - Any 80 or 100lb cover stock will be good for posters.

I recommend: www.mrfrench.com is awesome, cheap, and archival. Or just go to xpedx or something.

- ink - They make all kinds of inks for use on paper. Basically, you can use pretty much anything. Speedball Acrylic screen printing inks are the only Speedball product that doesn't suck loads of ass and they come in a lot of colors. Any waterbased screen printing ink is fine. Once you get the hang of printing, you can switch to using latex housepaint, which is like $1/qt from the mistint rack at Lowe's and Home Depot.

I recommend: any ink from www.valleylitho.com or www.dickblick.com (ONLY GET INK FROM THEM! everything else they have is crap!). water based is a lot easier to clean up than solvent based, so get that.

HOW IT WORKS

Step 1: Take your brand new screen and degrease it. You can buy fancy degreaser, but I think that's pointless since dishwashing liquid works fine ("tough on grease, not on your hands!"). Just rub it in and then wash it off.

Step 2: Once it's dry, you need to coat your screen with emulsion. If you've got a scoop coater, just pour the emulsion in it, position the screen vertically, and spread it on. If you don't have one, try to spread it as evenly as possible on your screen using your squeegee.

Step 3: Let the emulsion dry. Store you screen somewhere dark (remember, it's light sensitive!). Make sure you are storing it horizontally with the print side down (in the picture below, the print side is facing the camera). Put a can of soup or something under each corner in your bathroom overnight, that'll work great.

When it's dry, it'll look like this:


Step 4: Time to expose your screen. You need a print out of your artwork on either transparency or vellum (make sure the ink is opaque as possible). You need a seperate screen and a seperate positive for every color. Take two chairs or stools, and put a shower curtain rod over the back of them. Clamp your light to the rod. Put your piece of paper that's matte black on the floor, and then put the screen on top of that with the print side up. Place your print out (this is called a 'positive') REVERSED on top of the screen, and then put a piece of glass on top of that to hold it flat (don't use UV blocking glass).

Then just turn the light on. Your emulsion will come with instructions that will tell you how long you need to expose it for.


i broke my piece of glass last week, see how the positive isn't laying flat? that's bad. for this screen it didn't matter, for the final screen with text it did. a lot.

What happens is that everywhere light hits the emulsion, it becomes water resistant. Obviously, where there's black on your positive the light doesn't hit it, so that brings us to the next step.

Step 5: Wash out. Take your screen into your shower (or outside AT NIGHT - it's still light sensitive! - if you want to use your hose) and gently wash it out with water. Wet both sides, and then spray it down from the inside of the screen, like this:


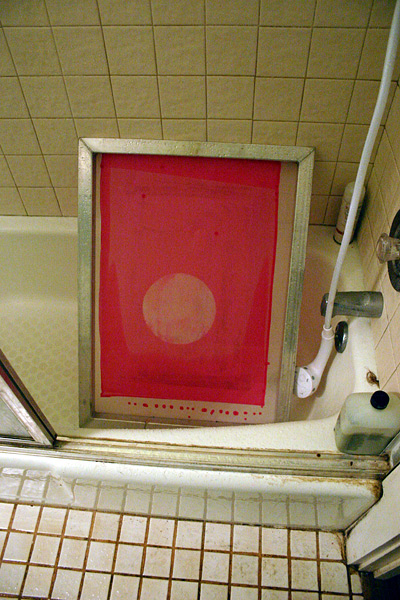
This is about halfway washed out. Before you stop, hold the screen up to the light and make sure no emulsion remains in your image area. If you overexpose it, it won't wash out all the way. If you underexpose it, all the emulsion will break down and come off.

Step 6: Dry it out. Box fans = good.

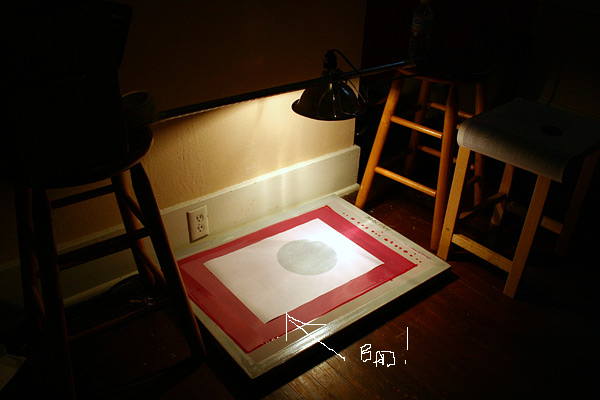
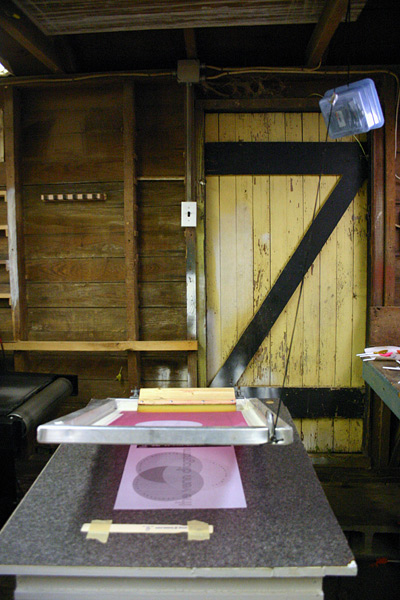
Step 7: When it's dry, we're almost ready to print. Now we have to get everything registered.


Getting the screen lined up to print in the right spot is called registration. First, tape your positive down along one edge to your print area. For the first color, line up the screen to the positive, and then lock the screen down with the clamps. When I do posters I always get a print of what it should look like with all the colors down for registration, like so:


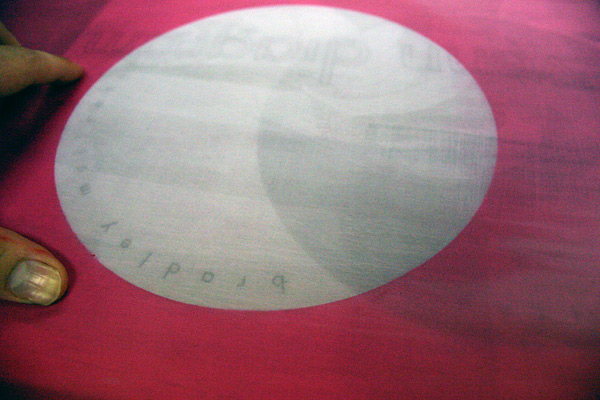
It's hard to see in this picture, but you'll be able to see through the mesh to line up your screen to your artwork.

Ok, know how we only taped down one edge of the positive? Lift up your screen and slide a piece of your paper underneath it and line it up where you wanted it printed on the paper. Now very carefully remove the positive so that just your piece of paper is on your print surface in the right spot.

Step 8: So you've got your paper in the right spot on your print surface, but you want to print 100, not 1! how do you get all your paper in that exact same spot?


This is called three point register. You take two tabs of cardboard (or anything, as long as it's thicker than what you're printing on) and put those along one corner, and then another tab all the way at the end of the longest side. Now you just slide each piece of paper into these tabs for every sheet you print.

Also, see that paint stirrer thing taped down? This is to mantain "off contact". Your screen should be about 1/8" up from the surface of what you're printing on. The jiffy clamps will hold it up that much on the other end, you need to prop it up a little on this end though.

Step 9: Almost fucking ready to print.


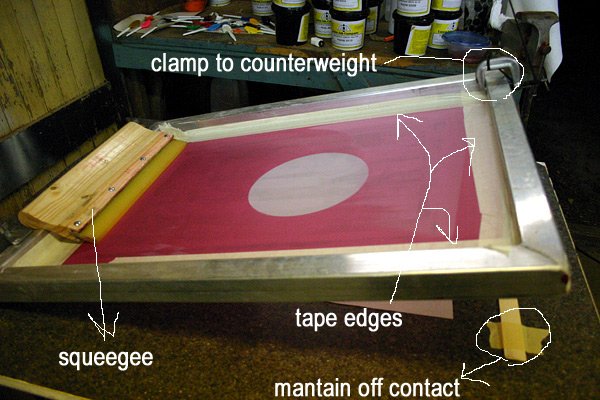
Tape up the edges to your screen so that ink doesn't leak through. Put your squeegee on the opposite end from where you'll be printing.

Optional Step 9.5: Using a counterweight on your screen helps immensely. Basically, you put a C-clamp on the end of your screen (as seen above) that is tied to a string. This string has some sort of weight attached to it at the other end, and mine goes up through a hook in the ceiling. The weight should be roughly equal to the weight of your screen and your squeegee. If you do this, between prints you just lift the screen up and it stays up. If you don't do this, you'll have to stick something under it to prop the screen up while you switch the paper out.

Here's a better picture of the counterweight:


Step 10: Now we're finally ready to print.

Put some ink on your screen. Always try to keep just enough on there to print with, otherwise it'll get messy and the ink will run everywhere. Just add more as you need it.


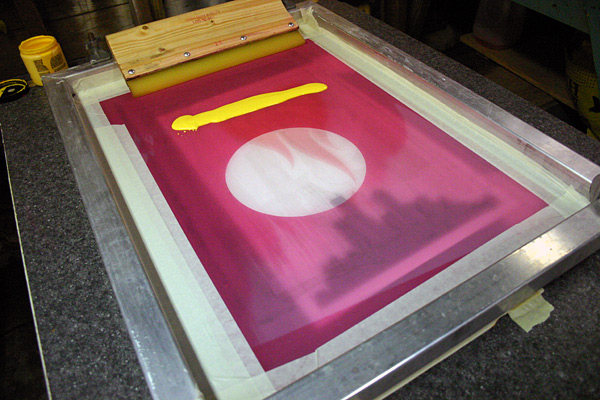
Now, how do you fucking print? There's two parts to printing, first you do what's called a flood stroke. Keeping the squeegee at about a 60 degree angle, and using minimal to no pressure, pull the ink towards you to cover the image area with ink. Do this while the screen is raised from the paper.

Flood stroke:


See how now your image area is filled with ink? Next step is the print stroke to lay that ink down on your paper. Lower the screen, and using even pressure (and keeping the squeegee at a 60 degree angle) go back across the image. You can either "pull" the squeegee towards you like you did with the flood stroke, or "push" it going the opposite way. Either way works and neither is more correct than the other.

Run off some test prints to get the ink flowing through the screen before you start on your good paper. I usually use newsprint, or here I used a misprint from a past run:


(Note: I thinned these inks down a lot to make them transparent, yours will be opaque)

Repeat that 60 times and we get:


Step 11: Ok great, but obviously most posters will be more than one color. How do we register the other ones so that all the colors are in the same spot on every poster? This is how I do it:

Tape your positive down again, just like you did for the first color. Line your screen up to it and clamp it in. So far we haven't done anything different than what we did with the first color.

Now, take one of your prints and slide it under your positive. Line it up, like so:


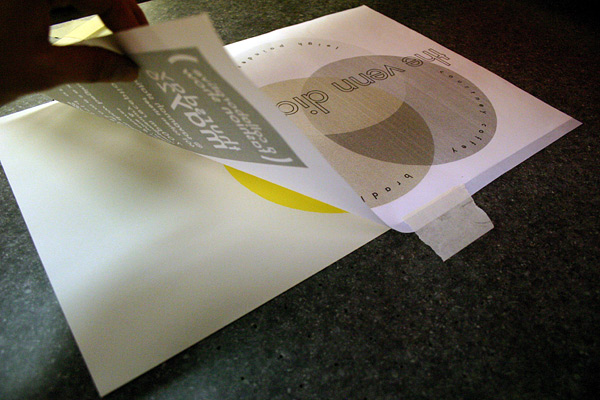
Take the positive off, put down your 3 registration tabs, and we're ready to go.


and repeat it again:


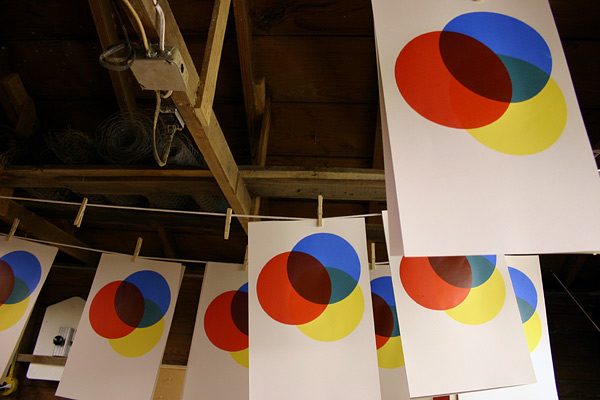
I've got one more color to go on this, which I'll do tomorrow.

When you're done with your screens, you can reuse them. Get a chemical called - amazingly - emulsion remover and it will make your screen as good as new.

Also, you don't want your paper to stick to the bottom of you screen after you print. The table in those pictures is a vacuum table i built, which uses a rigged up vacuum cleaner to hold the paper down. You can just use spray adhesive on your printing surface instead, that will work fine.


Hopefully I didn't leave anything out. I own/work in my screen printing shop every day, so if you have any questions about screen printing I can probably answer them.


EDIT:
plans for the vacuum table in those pictures are here: http://www.tenfortyfive.org/vacuumtable/

bradbane fucked around with this message at May 19, 2005 around 17:01

May 18, 2005: 23:07 # <
           Edit/Delete Message Quick Reply w/QuoteNormal Reply w/Quote Alert Moderators  
racecar
Jun 04, 2004

loser
this is amazing, thank you so much

May 18, 2005: 23:22 # <
           Edit/Delete Message Quick Reply w/QuoteNormal Reply w/Quote Alert Moderators  
Luxmore
Jun 05, 2001

Oh cool.

May 18, 2005: 23:29 # <
           Edit/Delete Message Quick Reply w/QuoteNormal Reply w/Quote Alert Moderators  
Kruxy
May 18, 2004


Amazing Monkey Hero
Wow, thanks for the detailed information. I was looking into screen printing for shirts and it's incredibly difficult to track down truly helpful information online.

This is great.

May 19, 2005: 00:02 # <
           Edit/Delete Message Quick Reply w/QuoteNormal Reply w/Quote Alert Moderators  
Tenterhooks
Jul 27, 2003


Bang Bang
Good stuff. I've been meaning to try this properly for a while - now I know what I need. By any chance does anyone know decent places to get supplies in the UK? Ordering from those places is liable to get me hit with some meaty tax on the doorstep.

May 19, 2005: 03:50 # <
           Edit/Delete Message Quick Reply w/QuoteNormal Reply w/Quote Alert Moderators  
dcor
Aug 23, 2002

Worthless Lurker
Fantastic. Thanks so much.

Is working with cloth fairly similar to working with paper? I'm not happy with the results of a t-shirt stencil I just did, and might give this a shot.

May 19, 2005: 04:27 # <
           Edit/Delete Message Quick Reply w/QuoteNormal Reply w/Quote Alert Moderators  
mcsexburger
Jul 10, 2003


If I were to do simple one colour design on fabric, and I wanted to use a paper stencil, do you have a recommendation of what kind of paper/whatever to use, and do I place this over the fabric, under the screen... and what's the best way to secure it there? Would I still want the screen to be 1/8" off the fabric/paper?

Excellent little (big) tutorial you have there =)

May 19, 2005: 05:05 # <
           Edit/Delete Message Quick Reply w/QuoteNormal Reply w/Quote Alert Moderators  
The Mother
Nov 14, 2004

Laying the smak down since 1983

quote:

dcor came out of the closet to say:
Fantastic. Thanks so much.

Is working with cloth fairly similar to working with paper? I'm not happy with the results of a t-shirt stencil I just did, and might give this a shot.

Cloth is similar to this process, however you would not want a waterbased ink, then
there is a need for a drying contraption. An iron with a pressing sheet can work for this in some cases. Also, some sort of spray to put on the surface the shirt gets put on while screening to hold it in place. There is more but can't think right now, not enough coffee in brain. There was a thread somewhere for printing shirts not too far back.

May 19, 2005: 07:49 # <
           Edit/Delete Message Quick Reply w/QuoteNormal Reply w/Quote Alert Moderators  
The Jafro
Jul 23, 2004

Big Hair Crew
This is very informative, I can use it for my painting class! Thanks for the tutorial bradbane.

May 19, 2005: 08:59 # <
           Edit/Delete Message Quick Reply w/QuoteNormal Reply w/Quote Alert Moderators  
Mein Eyes!
Apr 15, 2002

Wow, I finally understand how that works. Awesome post.

May 19, 2005: 10:17 # <
           Edit/Delete Message Quick Reply w/QuoteNormal Reply w/Quote Alert Moderators  
bradbane
May 21, 2004

DON'T CLOSE SH/SC THREADS GOD DAMNIT
dcor: the process is the same for printing on cloth, you just use different ink. i do custom tshirt printing as my job, and the professional ink for textiles is called plastisol. it doesn't air dry and has to be heated to 320 degrees to dry/not wash out. plastisol's not really an option unless you have a bunch of expensive equipment, but they make waterbased textile inks that will work fine if you're just going to print some stuff for yourself. those will probably have some special instructions (ie. add a catalyst, heat set with an iron, whatever) to make the ink wash proof. i know speedball makes some that has to be heatset, i've used union aerotex before when i did some pillowcases - it doesn't have to be heatset but you have to add a catalyst to the ink.

mcsexburger: i've never used a paper stencil. the only other stencil making process i'm familiar with is rubylith film. i would imagine paper stencils won't hold up for very long. my suggestion would be to either try to tape it to the bottom of your screen and see how that works, or put your stencil down on what you're printing on and just print like normal with an empty screen on top of that.

ideally, you always want about 1/8" off contact no matter what you're doing. the reason for this is that the mesh will bend down and gently deposit the ink on your substrate under your squeegee, and then snap back up leaving all the ink deposited. you'll run into a bunch of problems if you're printing on contact (image ghosting, smearing, uneven ink deposit, etc.). the first time i printed shirts before i had a press i taped a few quarters to the bottom of each corner of my screen, then placed the screen on my shirt and printed like that.

the mother: unless you have access to a flash or a conveyor dryer waterbased ink is the way to go for hobby stuff. leave plastisol to the professionals like me .

May 19, 2005: 10:24 # <
           Edit/Delete Message Quick Reply w/QuoteNormal Reply w/Quote Alert Moderators  
Stides
Aug 22, 2002

Mysted-out Kamikaze Midget
I remember seeing that poster with the city and the fire gradient thing in another thread and was amazed at the coolness of it. Thanks for taking the time to write this.

That said, this seems like a ridiculous amount of work. I don't know if I have ever seen a screenprinted poster before, but are the results that much better than a good color photocopier? I guess my question is what's the point? Please realise I mean absolutely no disrespect when I ask that. I am just curious of the economics of it.

May 19, 2005: 11:09 # <
           Edit/Delete Message Quick Reply w/QuoteNormal Reply w/Quote Alert Moderators  
brandino
Apr 15, 2002

Nice work Brad, I've always wondered what the process was for your prints (and now I know! and knowledge is power!)

May 19, 2005: 11:15 # <
           Edit/Delete Message Quick Reply w/QuoteNormal Reply w/Quote Alert Moderators  
SplitSoul
Dec 31, 2000


Having only two serigraphy classes left this year, this is a fucking godsend. Thank you so much.

May 19, 2005: 11:23 # <
           Edit/Delete Message Quick Reply w/QuoteNormal Reply w/Quote Alert Moderators  
bradbane
May 21, 2004

DON'T CLOSE SH/SC THREADS GOD DAMNIT
stides: it sounds like a lot of work but it's really not that much. when i did this the other night i made 2 screens and printed those 3 colors on the front and another one the back in about 3-4 hours. That includes the drying time between colors, which is long because i live in georgia and it's fucking humid, and with me leisurely hanging up each print between pulls. That's for 60-70 prints. I know I'm a really good printer and I'm probably better and quicker than most people, but even if you're new to printing it won't take you long (and most people aren't doing 5 color prints like this one, either).

screenprinting vs. color copier isn't really a question of quality, or the time that it takes. Screen printing is cheaper, sure, but even if it cost more than going to Kinko's i'd still prefer screen printing. it's the difference between owning a painting and going to the library and making a copy of it out of a book. you can run your hand over it and actually feel the layers of ink and see the tiny imperfections that come from an actual person doing it by hand. screen printed posters are handmade pieces of art that took some time and skill to make, as opposed to going to kinko's and handing them a disc. i mean i don't know about you, but i don't have any color copies hanging up on my walls, but i do have a lot of prints.

plus it's fun.

from an art standpoint, and i meant to say this in my original post but forgot, i like printmaking in general and think every artist should learn some sort of printmaking because it makes art accessible to everyone. that's why i wanted to do this post, to spread the screen printing gospel. i have friends who are painters, and they slave away on their paintings. half the time when they finish they don't want to sell it because they put so much time and effort into it... why should someone else get to enjoy it? and even if they do want to sell it, they have to sell it for a couple of hundred - or thousands! - of dollars to make up for all their time. who the fuck can afford to spend that much to own art? not me or anyone i know, i'm a broke college student. but if i do a print and do an edition of say 50, now 50 people can hang up that print and enjoy it, and since there's 50 of them i don't have to charge $800 or whatever. i can charge $15 or $20. i still get compensated for all the work and time i put into it, and normal people and not just super-fucking-rich-elitist-gallery-crawlers can have an original, handmade piece of art.

splitsoul: do they make you do pin registration? if so, punch your professor in the face and show him the wonders of three point register!

bradbane fucked around with this message at May 19, 2005 around 12:18

May 19, 2005: 11:54 # <
           Edit/Delete Message Quick Reply w/QuoteNormal Reply w/Quote Alert Moderators  
Rygar
Aug 25, 2002


this totaly sucks
This is a great tutorial. It's been years since I've done any sort of screening, and never in the comfort of my own home. What size frame would you recommend for 16x20 prints? I take it I'd need something like an 18" squeegee for that.

May 19, 2005: 12:51 # <
           Edit/Delete Message Quick Reply w/QuoteNormal Reply w/Quote Alert Moderators  
Rascal
Feb 17, 2004


a bebopper
Thanks for the info!

May 19, 2005: 12:53 # <
           Edit/Delete Message Quick Reply w/QuoteNormal Reply w/Quote Alert Moderators  
bradbane
May 21, 2004

DON'T CLOSE SH/SC THREADS GOD DAMNIT

quote:

Rygar came out of the closet to say:
This is a great tutorial. It's been years since I've done any sort of screening, and never in the comfort of my own home. What size frame would you recommend for 16x20 prints? I take it I'd need something like an 18" squeegee for that.

18" squeegee definitely. for the screen you might be able to get by with a 23x31 but that would be cutting it close on the width, next size up is 25x36 if you want to play it safe.

i'd call up rhemadura screen or victory factory and ask them what they think. or just ask them what the inside dimension is on those sizes and make sure they're at the very least 20x24 (16+4 x 20+4 = 2 inches of space on all sides).

May 19, 2005: 14:45 # <
           Edit/Delete Message Quick Reply w/QuoteNormal Reply w/Quote Alert Moderators  
Rojam Nairassoy
Jul 16, 2004

Thank you so much for this. I now have a summer project.

May 19, 2005: 15:30 # <
           Edit/Delete Message Quick Reply w/QuoteNormal Reply w/Quote Alert Moderators  
bradbane
May 21, 2004

DON'T CLOSE SH/SC THREADS GOD DAMNIT
i forgot i wrote this up for a friend a while ago. here are the plans to build a vacuum table like the one i have:

http://www.tenfortyfive.org/vacuumtable/

i think mine cost me about $75 when i built it, and about half of that cost was buying formica to put on top of it.

May 19, 2005: 17:00 # <
           Edit/Delete Message Quick Reply w/QuoteNormal Reply w/Quote Alert Moderators  
hbf
Jul 26, 2003

No Dice.
This is a really cool guide. I've always wanted to do some screen printing, but never had enough will to actually track down a good guide online, thanks for bringing one to me.

May 19, 2005: 18:24 # <
           Edit/Delete Message Quick Reply w/QuoteNormal Reply w/Quote Alert Moderators  
Stides
Aug 22, 2002

Mysted-out Kamikaze Midget

quote:

bradbane came out of the closet to say:
stuff

Thanks for the insight, I certainly can see it as an art.

May 19, 2005: 19:52 # <
           Edit/Delete Message Quick Reply w/QuoteNormal Reply w/Quote Alert Moderators  
bradbane
May 21, 2004

DON'T CLOSE SH/SC THREADS GOD DAMNIT
the final product:


i had to remake the screen for the black 5 times because the blueprint shop i get the vellum positives printed at fucked up and didn't print the ink opaque enough on that one for whatever reason, but i got it to (mostly) work. so definitely make sure of that when you make your positives.

May 19, 2005: 22:26 # <
           Edit/Delete Message Quick Reply w/QuoteNormal Reply w/Quote Alert Moderators  
trufflepig
Feb 06, 2004


i'm happy... yet i'm aware of the ironic ramifications of my happiness
you are fucking amazing.

i've been looking for a good tutorial for the LONGEST time now.

thanks for the links!

edit: a good trick i learned for making sure you are printing in exactly the same spot is to tape down a large sheet of acetate. print onto the acetate, and slide your paper directly underneath the sheet to where you want the print to go. then, lift off the acetate and you're ready to go. :]

trufflepig fucked around with this message at May 20, 2005 around 01:20

May 20, 2005: 01:17 # <
           Edit/Delete Message Quick Reply w/QuoteNormal Reply w/Quote Alert Moderators  
bananna fish
May 19, 2003


static cling stylin slippers
This is a brilliant how-to. Last summer I tried my hand at screen printing but due to lack of space to properly allow things to sit and dry, almost all my prints smudged/ran. This, however, looks absolutely do-able in my new house.

Also, your vaccum table looks fantastic. The legs add so much

May 20, 2005: 11:34 # <
           Edit/Delete Message Quick Reply w/QuoteNormal Reply w/Quote Alert Moderators  
argz
May 20, 2005


The hand says it all.
Wow, truly amazing, thank you very much. Great tutorial, I can't wait to get started

May 20, 2005: 11:47 # <
           Edit/Delete Message Quick Reply w/QuoteNormal Reply w/Quote Alert Moderators  
Ecobondage
Apr 14, 2005


Awesome thread!
Thanks so much.

May 20, 2005: 11:57 # <
           Edit/Delete Message Quick Reply w/QuoteNormal Reply w/Quote Alert Moderators  
Thee Uber Gnat
May 31, 2000


Retired.
Thank you very much for posting this. I've wating for someone to write a screen printing tutorial for a while now.

May 20, 2005: 12:06 # <
           Edit/Delete Message Quick Reply w/QuoteNormal Reply w/Quote Alert Moderators  
bradbane
May 21, 2004

DON'T CLOSE SH/SC THREADS GOD DAMNIT

quote:

trufflepig came out of the closet to say:
edit: a good trick i learned for making sure you are printing in exactly the same spot is to tape down a large sheet of acetate. print onto the acetate, and slide your paper directly underneath the sheet to where you want the print to go. then, lift off the acetate and you're ready to go. :]

yeah, that is a good method when you combine it with three point register, especially for things that have really, really tight registration because it takes into account mesh deflection and the human factor of printing. it's not very good for beginners though because you have to do it fast or your ink will dry in the screen.

there are a bunch of different ways to get good registration, the method i explained is the industry standard way of doing it, and the easiest and pretty foolproof.


bananna fish: clothes line + clothespins are your best friend. first print i did i just laid them out on the floor and that didn't work so well. i had the opportunity to buy some real, professional drying racks from a shop going out of business a while ago but i don't have room in my tiny shop . i don't ever do editions larger than about 75 or 100 anyways so it's not a big deal.

and those legs rule, they were like $5/piece at home depot haha.


now that everyone is doing this for a summer project, is anyone interested in doing a goon print exchange?

May 20, 2005: 12:07 # <
           Edit/Delete Message Quick Reply w/QuoteNormal Reply w/Quote Alert Moderators  
Rojam Nairassoy
Jul 16, 2004

quote:

bradbane came out of the closet to say:

- emulsion - Emulsion is a light sensitive liquid that you spread on your screen. This is what makes the magic happen.

I recommend: Ulano QTX from www.valleylitho.com

How much of this stuff is needed for each screen? Vallylitho has 28oz for $22.51... How long will that last do you think? Just trying to get an idea of pricing, thanks.

May 20, 2005: 13:00 # <
           Edit/Delete Message Quick Reply w/QuoteNormal Reply w/Quote Alert Moderators  
bradbane
May 21, 2004

DON'T CLOSE SH/SC THREADS GOD DAMNIT
i don't know how many ounces are needed for each screen (and it obviously varies depending on how big your screens are, the mesh size, and how much of them you're coating), but 28oz will probably last most people who only do this every once in a while a pretty long time. i got through a quart every 2-4 weeks, but i also print pretty much every day. you'll be able to get a lot of screens out of 28oz, even if you're doing big screens.

and when you're starting off you'll probably fuck up a bunch of screens anyways until you get the hang of it, so having a bunch of extra emulsion will be helpful .


also, if you get a scoop coater you'll use less emulsion overall since it puts down an even, thin coat.

May 20, 2005: 16:25 # <
           Edit/Delete Message Quick Reply w/QuoteNormal Reply w/Quote Alert Moderators  
Pnutticus
Jun 20, 2004

quote:

bradbane came out of the closet to say:


i had to remake the screen for the black 5 times because the blueprint shop i get the vellum positives printed at fucked up and didn't print the ink opaque enough on that one for whatever reason, but i got it to (mostly) work. so definitely make sure of that when you make your positives.

Get a cheap laser printer and print your own film positives, its easy. And if its not opaque enough, use some spray crystal stuff that will darken all the ink on it. I cant remember the name of the stuff i use, but it makes a huge difference.

May 20, 2005: 18:07 # <
           Edit/Delete Message Quick Reply w/QuoteNormal Reply w/Quote Alert Moderators  
Kaiju
Mar 18, 2003


Putting the lotion in the basket since 1975
This is quite the coincidence as I just sat down to google up some sites on how to make a screen print set up for shirts, but first I thought I'd check around SA for interesting threads.

This is an awesome tutorial and I can't wait to dive in. We have the South Korean movie "Oldboy" opening here next month and being the Chan Wook Park fanatic that I am, I wanted to make up a couple of shirts for my friends and I to wear to the showing.

For shits and giggles, here's my design:

May 20, 2005: 18:40 # <
           Edit/Delete Message Quick Reply w/QuoteNormal Reply w/Quote Alert Moderators  
TheAgent
Feb 15, 2002


I want your tongue in my intestines. Fuck me like a clock.
this is pretty fucking awesome

May 20, 2005: 18:45 # <
           Edit/Delete Message Quick Reply w/QuoteNormal Reply w/Quote Alert Moderators  
iwannabebobdylan
Jun 09, 2004


Party Hat Monster
Fucking subscribed. Learning this was one of my goals for the summer, you started me on my to-do list the day I finished classes. Thanks a ton for this, can't wait to go looking for supplies.

May 20, 2005: 18:49 # <
           Edit/Delete Message Quick Reply w/QuoteNormal Reply w/Quote Alert Moderators  
Kaiju
Mar 18, 2003


Putting the lotion in the basket since 1975
A strange question I just thought of:

Is it possible to do something like a four color process via silk screen?

I doubt it, but I always wondered how some of the clothing companies I've seen print photo images on shirts. Four color process is the only way I can think of (since I work in a print shop presently).

May 20, 2005: 19:13 # <
           Edit/Delete Message Quick Reply w/QuoteNormal Reply w/Quote Alert Moderators  
Pnutticus
Jun 20, 2004

quote:

Kaiju came out of the closet to say:
A strange question I just thought of:

Is it possible to do something like a four color process via silk screen?

I doubt it, but I always wondered how some of the clothing companies I've seen print photo images on shirts. Four color process is the only way I can think of (since I work in a print shop presently).

yes,it is, and it gives cool results.

May 20, 2005: 19:42 # <
           Edit/Delete Message Quick Reply w/QuoteNormal Reply w/Quote Alert Moderators  
bradbane
May 21, 2004

DON'T CLOSE SH/SC THREADS GOD DAMNIT

quote:

Pnutticus came out of the closet to say:


Get a cheap laser printer and print your own film positives, its easy. And if its not opaque enough, use some spray crystal stuff that will darken all the ink on it. I cant remember the name of the stuff i use, but it makes a huge difference.

i actually have one a large format inkjet that can do 13x19 positives, but i'm kind of living between 3 addresses and it's in a box somewhere. that spray stuff does work great though. the best option is what i usually do (special transparencies for screen printing on an inkjet). i've done everything from vellum to oiling up normal paper.

kaiju: yes, of course you can do 4 color process. if you can do the seperations, all the major ink companies have process inks (i actually used process yellow for this poster).

there are a bunch of different methods of doing the seperations for doing photos and such like you see on shirts. 4 color process is one of them, simulated process is probably more common.

May 20, 2005: 20:44 # <
           Edit/Delete Message Quick Reply w/QuoteNormal Reply w/Quote Alert Moderators  
Darth Brooks
Jan 15, 2005

Danger Will Robinson Danger
Very good job on the tutorial. I work in a commericial screen printing plant so I'm familiar with a lot of the processes you talk about. We use left handed guides so that we can guide with our left and and pull the print (to put on the dryer belt) with the left hand. On most print runs we can do 800 or so prints an hour if we're cooking.

Just in case your curious, this is a picture of the kind of press we use, a Lawson Geniette. They are old, but actually far more adaptable than the newer M&M press. We usually use solvent based ink from Nazdar and Sericol. Most common is called XG, although we do use a UV cured ink, anomg other specialty inks,such as epoxy and enamel inks. You'll notice the differnt squeegees on the side as well as the dryer. We use wooden block screw down tight to ensure perfect registration of prints. With this machine we can register to closer than a human hair and hit the same spot for thousands of prints. I love this machine.


The place I work at is R. Mort inc. (crappy website, unfortunatly---> http://www.rmortcompany.com/ )

May 20, 2005: 22:55 # <
           Edit/Delete Message Quick Reply w/QuoteNormal Reply w/Quote Alert Moderators  
bradbane
May 21, 2004

DON'T CLOSE SH/SC THREADS GOD DAMNIT
holy shit that is the cleanest and most organized shop i've ever seen. awesome press too, i wish i had room for one .

i know printers who swear by the nazdar solvent based stuff (5900? something like that), but i hate the smell and it's nice to just be able to clean up with water.

i don't know why i've never thought of using my conveyor dryer to dry posters, but i guess i will do that next time.

May 20, 2005: 23:43 # <
           Edit/Delete Message Quick Reply w/QuoteNormal Reply w/Quote Alert Moderators  
Rate
thread: 
This thread sucks ass. This is not a good thread. This is a mediocre thread. This is a somewhat entertaining thread. Excellent thread!
Post New Thread Quick ReplyNormal Reply
The Awful Forums > The Finer Arts > Creative Convention > How to screen print posters for fun and profit (56k go to kinko's)
 (4): 1 2 3 4 »
Subscribe to this Thread

Powered by: vBulletin Version 2.2.9
Copyright ©2000, 2001, Jelsoft Enterprises Limited.
(server: frylock)